Redis is an in-memory data structure store that can be utilized as a caching solution to improve the performance and speed of WordPress websites. When integrated with WordPress, Redis can significantly reduce the time taken to fetch data from the database, leading to faster loading times for your site’s pages.
In this tutorial, we will walk you through the steps to set up and configure Redis object caching for your WordPress website hosted on Hostinger.
Why Use Redis Object Cache?
Redis object caching in WordPress offers numerous benefits that significantly improve the performance and user experience of your website. By storing data in memory, Redis allows quick access to cached information, leading to faster page loading times. This, in turn, reduces the load on the database by caching frequently requested data, making your site more efficient and scalable.
As a result, your WordPress site can handle higher traffic volumes without sacrificing performance. With improved loading speeds, visitors are more likely to stay on your site, resulting in a better user experience. Redis also provides efficient memory usage, allowing you to cache specific data and control how long it is stored. Overall, Redis object caching is a valuable tool for enhancing your WordPress site’s performance and ensuring a smoother user experience.
Steps to Setup Redis Object Cache in WordPress in Hostinger
Prerequisites
- A WordPress website hosted on Hostinger (Business or Higher hosting plan).
- Enable the object cache feature from the hostinger hPanel (do it from Hosting->WordPress->Overview)
- A Redis Cloud account with a free 30 MB database (from Redis Labs).
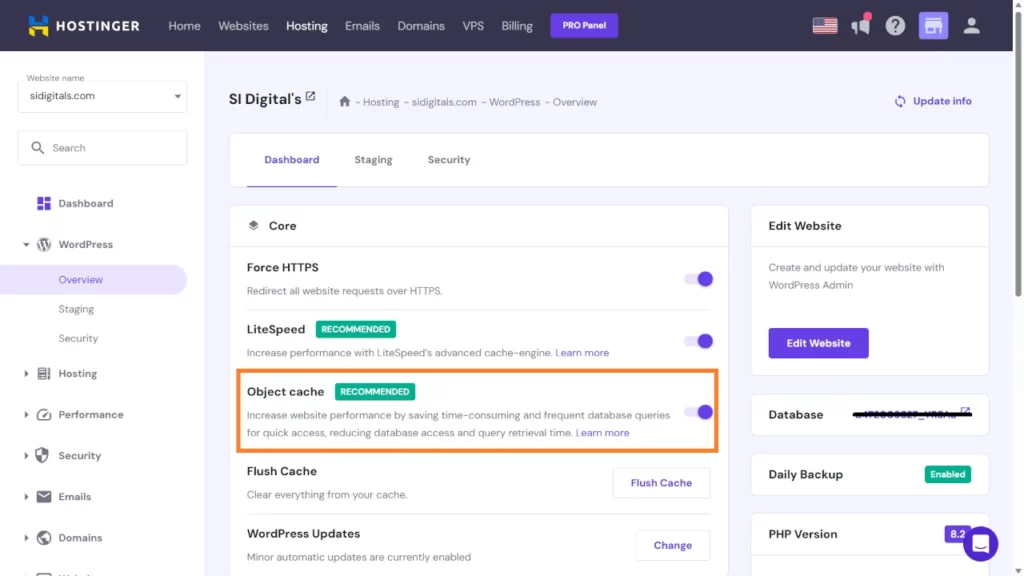
By default, this option will immediately enable object cache with the opensource Memcached database method. Which is also fair enough for begineers.
Step 1: Create a Redis Cloud Database

- Sign up for a Redis Cloud account by visiting the Redis Cloud website (https://redis.com/try-free) and completing the registration process.
- After successful registration, log in to your Redis Cloud account.
- Create a new database by selecting a free plan and choosing your desired location. This will generate a 30 MB free database for you to use.
Step 2: Obtain Connection Credentials
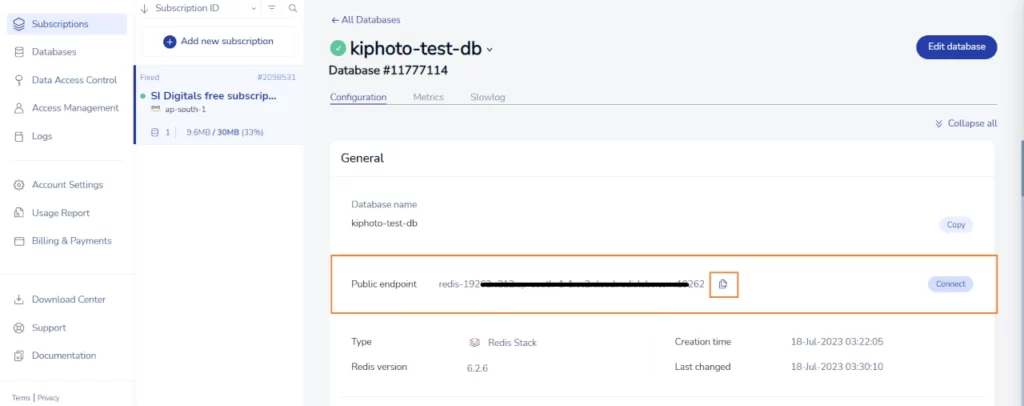
- Once your database is created, click on its name to access the database information page.
- Note down the public endpoint address provided on this page. This will be your host address.
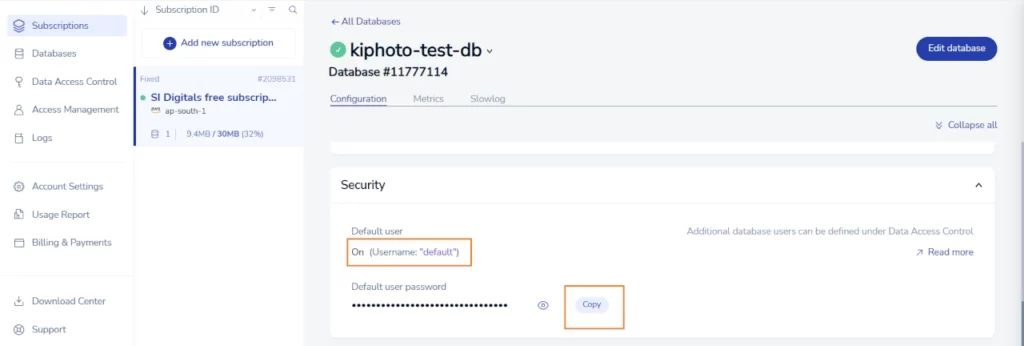
- Scroll down to the Security section and locate the login credentials. The default username will be “default,” and you can copy the default user password.
Step 3: Install Litespeed Cache Plugin
- Log in to your WordPress dashboard.
- Navigate to the “Plugins” section and click on “Add New.”
- Search for “Litespeed Cache” in the plugin search bar and click “Install Now.”
- After the installation is complete, click “Activate” to enable the plugin.
Step 4: Configure Redis Object Caching in Litespeed Cache Plugin
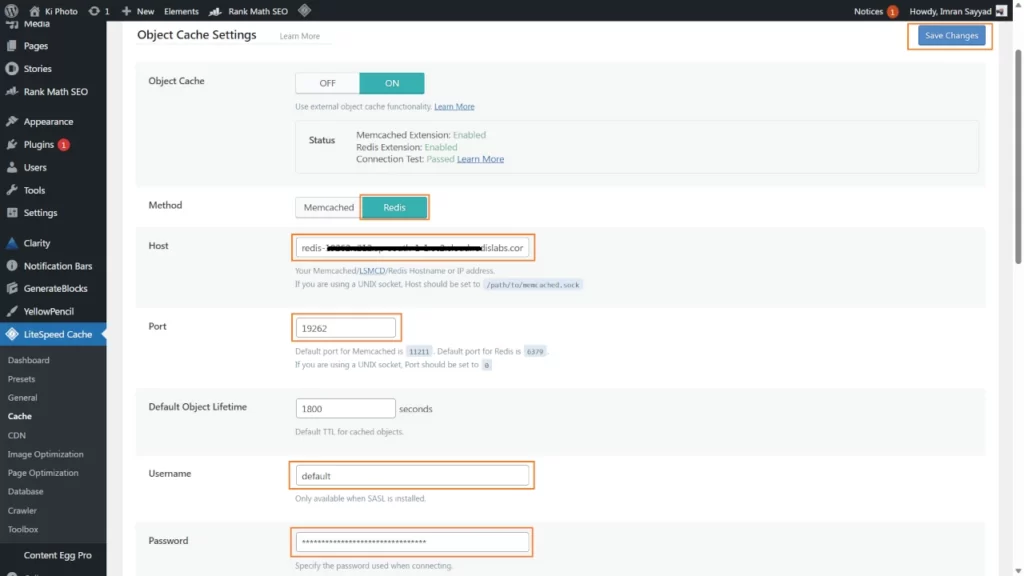
- In the WordPress dashboard, go to “LiteSpeed Cache” from the left-side menu and click on “Settings.”
- Choose the “Object” tab at the top of the settings page.
- Under “Object Cache,” select “Redis” as the caching method.
- Enter the host address and port number obtained from Step 2 in the corresponding fields.
- Provide the username (which is “default”) and paste the default user password.
- Click on the “Save Changes” button to apply the settings.
Step 5: Verify Redis Connection
- After saving the changes, the page will reload, and you should see all the options in green, especially “Connection test: Passed.” This indicates a successful connection to the Redis database.
Step 6: Monitor Redis Database
- To check the size of your Redis database, log in to your Redis Cloud account and navigate to the apps page.
- You will be able to see the current database size in Megabytes.
Step 7: Monitor Redis Object Cache
For more comprehensive monitoring of your Redis object cache, you can use the Redis Insight module. Download the Redis Insight Module from the Redis Labs account dashboard.
Install Redis Insight on your computer and add the Redis database with the same host address and login credentials used in the WordPress Litespeed cache plugin.
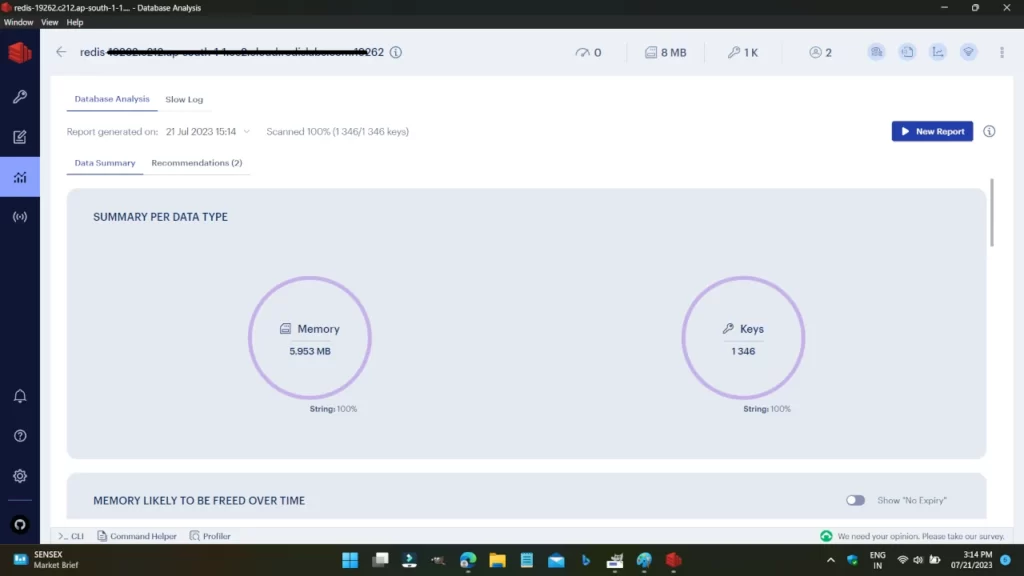
With Redis Insight, you can monitor memory consumption, stored object cache keys, their size, and expiry.
Conclusion
By following these steps, you have successfully set up and configured Redis object caching for your WordPress website hosted on Hostinger. Redis caching can significantly boost your website’s performance and improve the overall user experience.
With Redis Cloud, you can enjoy the benefits of faster page loading times without the need for custom-configured VPS hosting plans. Remember to monitor your Redis database periodically and consider upgrading your plan if your project grows larger, as Redis Cloud offers scalable options to meet your needs. Happy caching!